Perform Line-Item Level Review
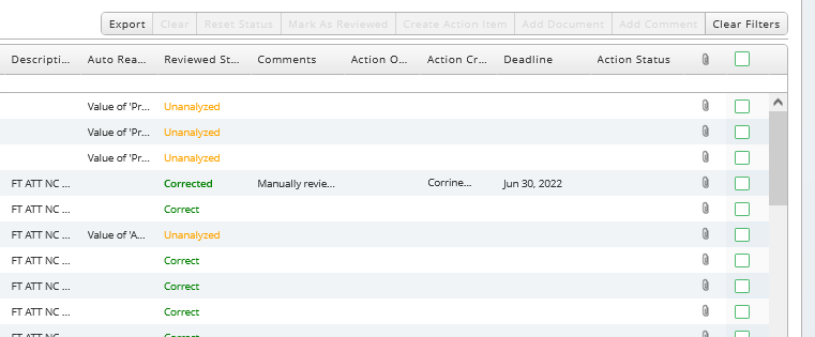
The Line Item table is the area of the Reconciliation Form that shows the details of the line items that have been retrieved from the ERP![]() Enterprise resource planning (ERP) refers to a type of software that organizations use to manage day-to-day business activities such as accounting, procurement, project management, risk management and compliance, and supply chain operations. A complete ERP suite also includes enterprise performance management, software that helps plan, budget, predict, and report on an organization’s financial results. system. It is possible to configure which line item details to retrieve and show in this form as part of the technical configuration of the reconciliation.
Enterprise resource planning (ERP) refers to a type of software that organizations use to manage day-to-day business activities such as accounting, procurement, project management, risk management and compliance, and supply chain operations. A complete ERP suite also includes enterprise performance management, software that helps plan, budget, predict, and report on an organization’s financial results. system. It is possible to configure which line item details to retrieve and show in this form as part of the technical configuration of the reconciliation.
By default, BSR retrieves line items from SAP using the ABAP program RFITEMGL. Any field that this program can retrieve can be represented in BSR line items. Configure additional fields in RFITEMGL to represent BSR line items.
In the image below, in addition to the regular line item information, additional columns that have been created by the solution are showing the reconciliation status of the following:
- Result description of the auto certification rules
- The review status of the line item
- Action items
- Action item creators
- Deadlines
- Action item status
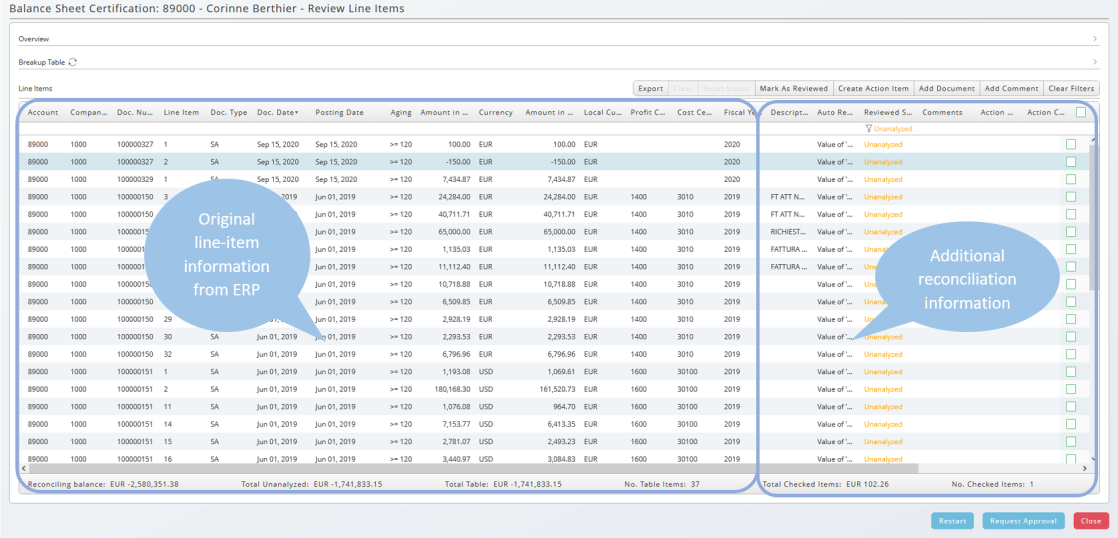
The available action buttons for individual line items or groups of line items are shown at the top right side of the Line Item table section.
- Post a clearing for selected line items
- Reset the reconciliation status of line item(s)
- Mark line item(s) as reviewed
- Create an action item for line item(s)
- Add a comment to line item(s)
- Add a document to line item(s)

To perform an action, select the relevant line item(s) and choose on the desired action button to perform the action.
The action buttons can only be chosen if line items have been selected.
The latest actions and respective messages from the system are shown at the top of the Reconciliation Form.
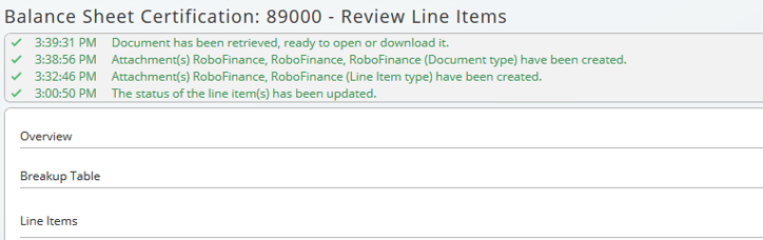
Click on the x button in the top right corner of the Reconciliation Form to close this message pane.
Filter Line Items
The Line Item table allows for data filtering in every column of the table.
To filter:
- Hover in the cell below the column header. The text add filter will appear.
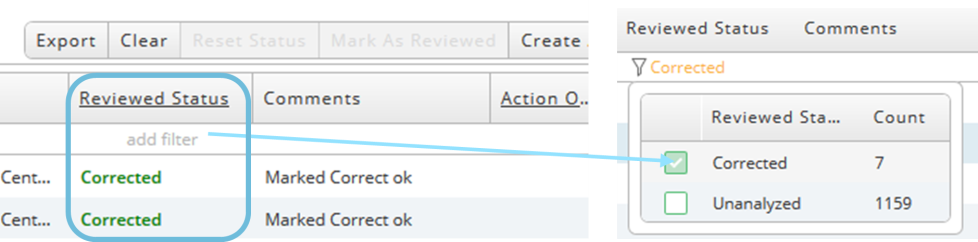
- Click on add filter to define appropriate filter criteria for that column.
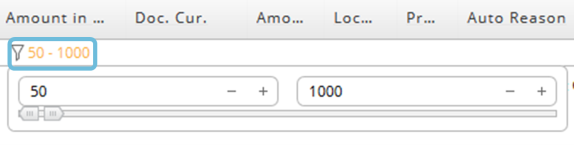
- Select specific entries (see above), limit a range, or search for text, depending on the type of column (data). The filtered value will be shown right next to the Filter icon.
To delete a filter, choose the Filter icon. A red x indicates when deleting is possible.
Review Line Items
Select line items using the check boxes on the right-hand side and choose the Mark as reviewed button to confirm that the line item is okay.

A prompt to add a comment will appear. Setting a deadline is optional. If the deadline is reached, the Reviewed Status of the line items will be reset to Unanalyzed.
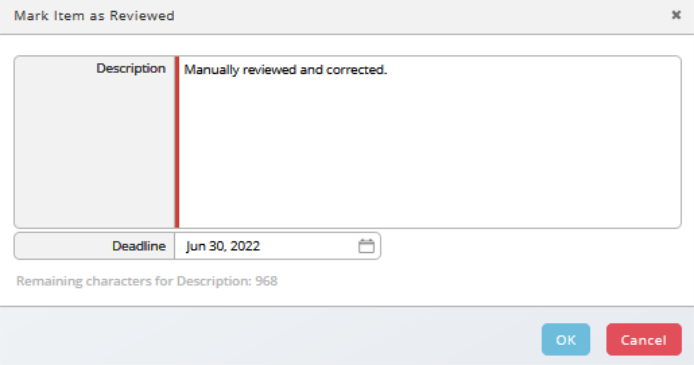
Corrections are visible immediately in the form. A tooltip shows more information when hovering over the comment. Clicking on the comment displays the entire comment.
Create Action Items
- Select the line item(s) and choose the Create Action Item button.
- In the Create Action Item popup window:
- In the Assignee field, select the assignee of the action item from the dropdown.
- In the Description field, include a brief description of what the action item is. Note
 SAP and Redwood use a note system to communicate important pieces of information to their customers.
You can access SAP Notes at https://launchpad.support.sap.com and Redwood Notes at https://notes.redwood.com/<Number>.: This is a required field.
SAP and Redwood use a note system to communicate important pieces of information to their customers.
You can access SAP Notes at https://launchpad.support.sap.com and Redwood Notes at https://notes.redwood.com/<Number>.: This is a required field.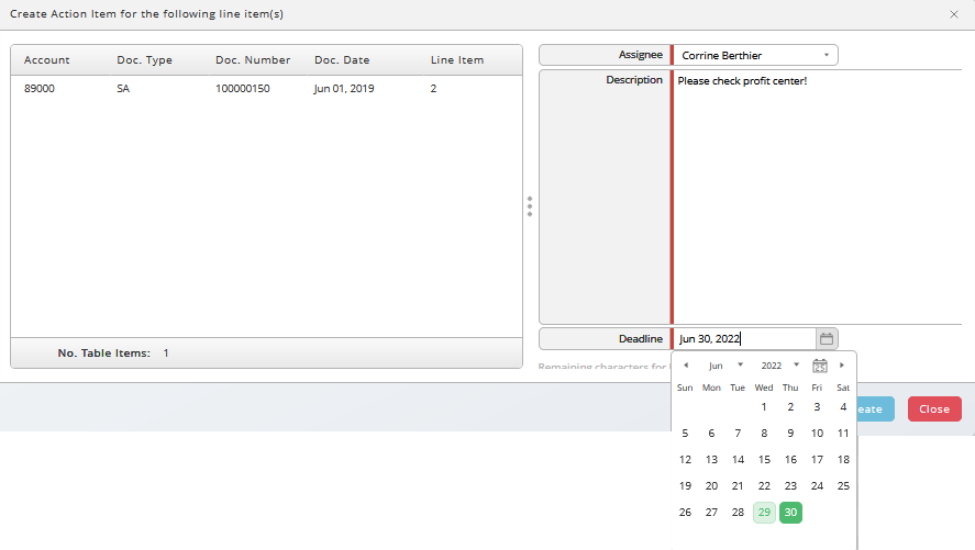
- Select a date from the Deadline field dropdown calendar.
- Click the OK button and the system will create the action item and show an appropriate message.
- As part of the action item workflow, the assignee will receive an email.
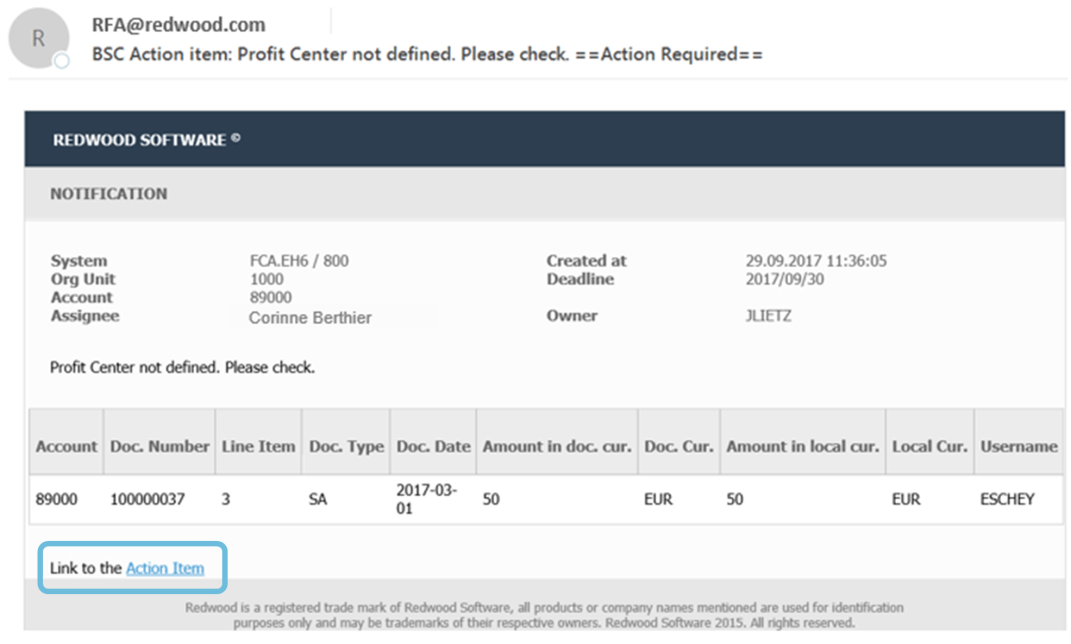
The email informs the assignee about the necessary action(s) and the relevant line items. A link to the action item itself is included. Clicking on this link allows the assignee to access the action item and respond to it.

The Inbox presents the same information on action items as the email, shows the same link, and also allows access to action items.
After the assignee has reviewed and completed any outstanding action items, the status of the action item will be set to Completed. Action items can be filtered from the Inbox, even after they have been completed.
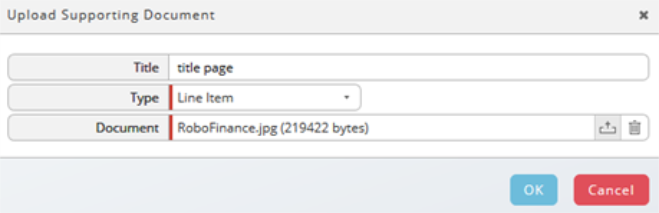
Upload Additional Documents to a Line Item
Additional documents or further comments may be added to one or multiple line items. Once documents have been added to the line items in the reconciliation, those documents will also be uploaded to the respective ERP system on the line item- or document-level, depending the Type chosen.
To start this process:
- Select one or multiple line items in the Reconciliation Form and choose the Add Document An object used to store documentation on specific objects or processes. It can be used for other purposes as well, for example, to log changes made to process definitions, for example. button.

- Enter a document title in the Title field.
- In the Type dropdown choose whether the uploaded document will be attached to the line item-level or the document-level in ERP.
- In the Document field, browse to search for the document to upload and press the Upload button to the left of the Trashcan icon.
- Click the OK button to upload the selected document to the reconciliation in Redwood as well as to ERP.
- When the document is uploaded, a note will be added to the Comments section of the line item(s).

- Click on the Comment column of the appropriate line item(s) in the Reconciliation Form to see the entire history or to access to the uploaded files.
Important Notes on ERP Upload for SAP:
- If two line items are selected and the upload type Line Item is chosen, then the uploaded document will be added to both line items in SAP.
- If one line item is selected and the upload type Document is chosen, then the uploaded document will be added to all line items that belong to the same document number.
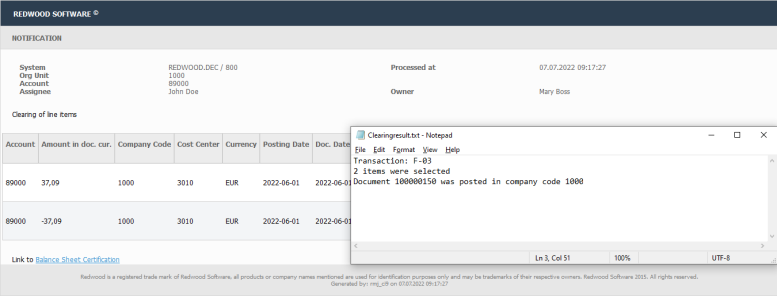
Clearing
From the Reconciliation Form it is also possible to clear line items both within the Redwood solution as well as in the ERP system.
- Select line items and choose the Clearing button.

- This starts the process that posts a clearing document into the ERP system. In the Reconciliation Form the Clearing running status indicates that the clearing is in progress.

- After the clearing has completed the status will display either Clearing completed or Clearing failed, depending on the outcome of the process.
- The preparer will also receive an email notification with the details of the clearing process in a text file attachment.
Restart the Preparation
Use the restart functionality in cases where data is outdated, or things have changed and a refresh of the information of the account being reconciled is necessary.
The button to restart the reconciliation is shown at the bottom of the Reconciliation Form.
Pressing the Restart button will start the reconciliation over from Step 1 listed in Process Overview, which will redo the automated parts of the reconciliation as well as any manual review steps.
In detail, the system will:
- Lock Locks are used to ensure that specific process do not run concurrently. You can add a lock to a process definition to define which processes can and cannot run together. There are three types of locks, Simple (default, only one process is allowed to hold the lock), Counted (only <n> processes are allowed to hold the lock), and SharedExclusive (Locks have a count property, allowing one or more processes to run). When the count of a SharedExclusive lock is greater than 1, multiple processes can hold one or more counts. A process that requires ncounts can only get hold of the lock if n or more counts are available. the current Reconciliation Form and make it read-only.
- Retrieve updated information on account- and line item-level.
- Apply the defined rules again.
- Generate a new Reconciliation Form with the updated account and line item data.
- Remember all the actions that have been performed on the line items in the previous reconciliation run and merge them into the updated form with the more recent line item data.
- Send a new notification with a link to the newer Reconciliation Form that was just created.
With a restart, the reconciliation data from the account is refreshed therefore
- Some line items that no longer need to be reviewed might have been removed compared to the first line item list.
- New additional line items might have been added to the list to review.
Preparation work will be saved and is not lost if the line item is still relevant after the restart and data refresh.
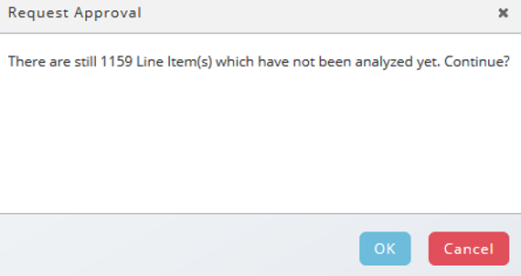
Finish the Preparation
The Request Approval button to forward the reconciliation to the approver appears at the bottom of the Reconciliation Form.
If all line items have not been reviewed, a popup notification will be displayed indicating how many line items have not yet been analyzed, as shown in the image below.
After forwarding the reconciliation to the approver, the Reconciliation Form will be locked and can no longer be edited. A notification message will be displayed on the Reconciliation Form as shown in the image below.

Using links to the Reconciliation Form after it has been completed will display a message that the page is read-only.
