Enabling Row Level Security for MVP Dashboards
By default, when viewing an embedded PowerBI Dashboard![]() The dashboard allows you to monitor one or more systems using graphs and dials. from within Redwood, if the logged in user has access to the dashboard, they have access to view all content within the dashboard.
The dashboard allows you to monitor one or more systems using graphs and dials. from within Redwood, if the logged in user has access to the dashboard, they have access to view all content within the dashboard.
However, it may be desirable for the customer to restrict user access to only certain values such as a specific company code, cost center, etc. This can be done with a combination of PowerBI Roles and Redwood Roles.
Overview: Row Level Security Integration with Redwood
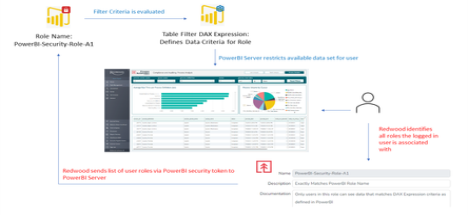
As part of the integration with PowerBI, when a user logs in to Redwood and attempts to access a Power BI dashboard, all Redwood security roles associated with the logged in user. For the targeted dashboard, a list of all the user’s roles are then sent by the designated Service Principal account as part of the security token to the customer’s PowerBI Workspace.
For each of the roles associated with the user, PowerBI evaluates the filter criteria (as defined in the dashboard logic) to determine all data elements the user is allowed to view.
Once determined, all rows of data that the user is not allowed to view are filtered out by PowerBI and the resulting dashboard visuals are displayed within Redwood using the subset of data provided.
If even a single security role is enabled within PowerBI, all access to the dashboard will require users be in a valid role. This is a limitation of PowerBI - not Redwood. In this case, a ‘catch all’ role or something similar may be needed for power users. Customers should refer to Microsoft PowerBI documentation for details on how to create more complex DAX Expressions to facilitate the equivalent of a wildcard filter and a corresponding Redwood role may be needed if not already present.
Microsoft will raise an error if a user attempts to access a dashboard for which they have no associated security roles.
Sample Row Level Security Setup
In this example, we will create row level security based on the value of a company code. This example assumes that the Redwood MVP Close Management dashboard is used and the close_management table is available for selection. To implement this, three key objects are needed: a PowerBI Security Role, a corresponding PowerBI Filter Expression and a Redwood Security Role that exactly matches the PowerBI Security Role name.
PowerBI Security Role and Filter Creation
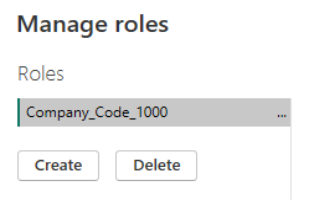
Within PowerBI Desktop, select the Modeling menu and click on the Manage roles icon.

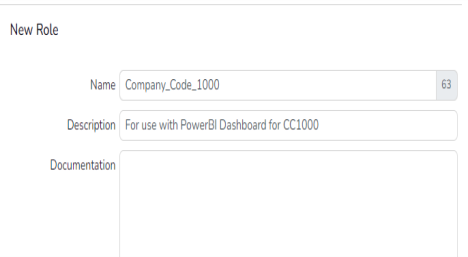
Click the Create button and enter a name of “Company_Code_1000”.
REMEMBER: PowerBI and Redwood Role names must be an exact match for row level security to work so all Redwood role naming convention limitations apply (e.g. no spaces).
Click on the close_management table name and click on the three dots […]. The Add filter sub-menu will display. Select the company_code option.
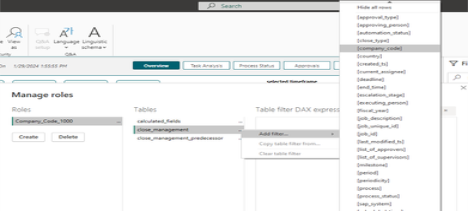
The default DAX expression will populate the [company_code] value with the word “Value”. Change this to be a value of “1000”.
Click the Verify button to ensure your expression syntax is proper and then click the Save button.
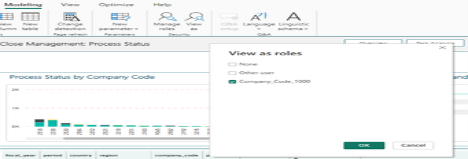
In the graphic below, you can see that a number of company codes are shown in the “Process![]() A process is a Process Definition that is submitted into a queue. When users request the execution of a chain, a process server creates a record in the Job table, calculates the start time and sets the status to Assigned. Status by Company Code” visual. To simulate what a user with your newly created security role, again click on the Modeling menu and click on the View as icon. Select the Company_Code_1000 role name and click the OK button.
A process is a Process Definition that is submitted into a queue. When users request the execution of a chain, a process server creates a record in the Job table, calculates the start time and sets the status to Assigned. Status by Company Code” visual. To simulate what a user with your newly created security role, again click on the Modeling menu and click on the View as icon. Select the Company_Code_1000 role name and click the OK button.
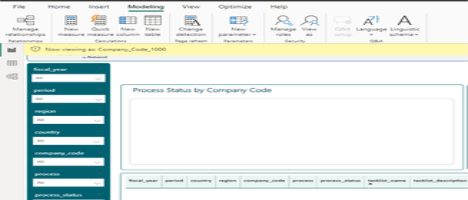
PowerBI Desktop will display a notice indicating the role name that is being simulated. In the sample dataset we are working with, there is no Company Code 1000. As such, there is no data being displayed in any of the visuals. Select the View as icon again and choose the None option to return the view to the entire data set.
Redwood Security Role Creation
Within Redwood, if row-level security is enabled, a corresponding Security Role for each PowerBI security role must exist (and be populated) for users to access the targeted dashboard. Standard procedures for creating Redwood Roles should be followed, ensuring that naming conventions exactly match those used within PowerBI.